

Ninja Forms is a powerful form builder plugin for WordPress that allows you to create and customize forms with ease. In this video tutorial, we will explore the Ninja Forms Conditional Logic extension, which enables you to display or hide form fields based on specific conditions. By following these steps, you’ll be able to utilize the Conditional Logic extension to create dynamic and interactive forms tailored to your needs.
You can also watch the video tutorial:
Using the Ninja Forms Conditional Logic Extension:
Step 1: Access the Ninja Forms Dashboard:
Hover over the “Ninja Forms” tab in your WordPress dashboard and click on “Dashboard” to access the Ninja Forms dashboard. This is where you can manage your forms and their settings.

Step 2: Create a New Form:
Start by creating a new form using the blank template. Add and customize the form fields according to your requirements. This will serve as the foundation for implementing conditional logic.

Step 3: Obtain the Conditional Logic Extension:
Log into your Ninja Forms account and navigate to the “Downloads” section. Locate the Conditional Logic extension and download it to your computer.

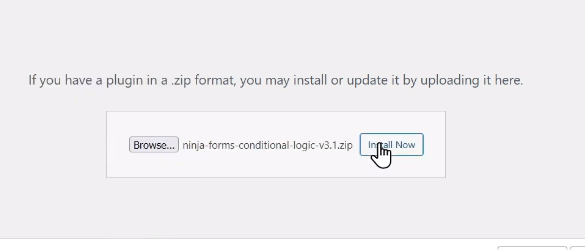
Step 4: Install and Activate the Extension:
Return to your WordPress dashboard and go to “Plugins” > “Add New.” Choose the “Upload Plugin” option and select the Conditional Logic extension file. Click on “Install Now” and once installed, activate the extension to enable its functionality.
Step 5: Configure Conditional Logic for the Form:
Access the Ninja Forms dashboard and select the form for which you want to use the Conditional Logic extension. Go to the “Advanced” tab and locate the “Conditional Logic” settings. Click on it to enter the conditional logic configuration.

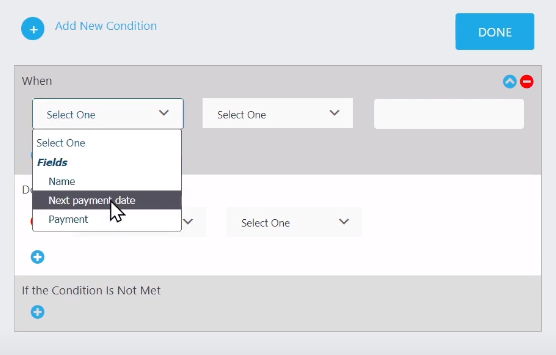
Step 6: Set the Conditional Logic:
Define the conditions under which specific form fields should be displayed or hidden. For example, you can set a condition to show the “Next Payment Date” field only if the payment option selected is “Unbuilt”. Adjust the conditions based on your specific form requirements.
Step 7: Publish and Preview the Form:
Once you have configured the conditional logic, click on the “Publish” button to save the changes. Preview the form on your website to test the conditional logic in action. Make test entries and observe how the form fields appear or hide based on the defined conditions.
Conclusion:
Congratulations! You have successfully learned how to use the Ninja Forms Conditional Logic extension. By implementing conditional logic, you can create dynamic and personalized forms that adapt to user input. The Conditional Logic extension adds a layer of interactivity to your forms, enhancing their usability and effectiveness. Experiment with different conditions and field combinations to optimize your forms for various scenarios. Enjoy creating smart and responsive forms using Ninja Forms and the Conditional Logic extension.

0 Comments