

In this tutorial, we will guide you on how to show menu items based on user roles in WordPress. This functionality allows you to display specific menu items to users based on their logged-in status or user roles. Here’s how you can achieve it.
You can also watch the video tutorial:
Having said that, let’s move on to the steps on How To Show Menu Items Based On Specific User Roles In WordPress.
Step 1: Install and Activate the User Roles Plugin
In your WordPress admin dashboard, go to “Plugins” and click on “Add New”. Search for a plugin called “User Roles” and install it. Once installed, activate the plugin.

Step 2: Configure Menu Items
Next, go to “Appearance” and click on “Menus” to edit your menu. Add the desired menu items to the menu structure. For example, you can add a “Login” link and an “Account Details” link.

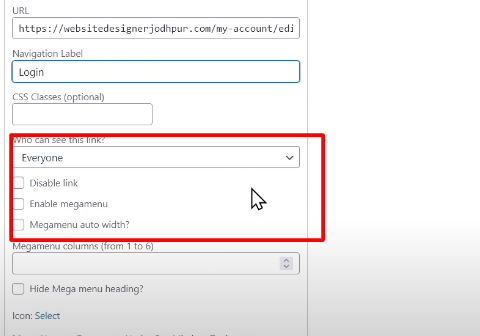
Step 3: Set Visibility for Menu Items
For each menu item, you can configure the visibility based on user roles. Expand the menu item and look for the “User Roles” option. From there, you can select which user roles should see the menu item. You can also set the label for the menu item.
Step 4: Save the Menu
Once you have set the visibility for each menu item, click on “Save Menu” to save your changes.

Step 5: Test the Menu Items
Now, you can test the menu items based on the user’s logged-in status or user roles. If you are logged out, you should see the “Login” link in the menu. After logging in, the “Login” link will be replaced with the “Account Details” link.
By following these steps, you can customize your WordPress menu to display specific items based on user roles. This can provide a more personalized and dynamic menu experience for your users.
If you have any additional questions or need further assistance, feel free to ask.

0 Comments