

Contact Form 7 is a popular plugin for creating forms in WordPress. In this video tutorial, we will walk you through the process of setting the default field option in Contact Form 7. By preselecting a default option in a dropdown menu field, you can enhance the user experience and provide a more streamlined form submission process. Let’s dive into the step-by-step guide.
You can also watch the video tutorial:
Having said that, let’s move on to the steps on How To Set Default Field Options In Contact Form 7.
Step 1: Install and Activate the Contact Form 7 Plugin
Before getting started, make sure you have the Contact Form 7 plugin installed and activated on your WordPress site. If you haven’t done so, you can install it from the WordPress dashboard by searching for “Contact Form 7” in the Plugins section.
Step 2: Create a New Contact Form
- Hover over the “Contact” section in the WordPress sidebar and click on “Add New” to access the form builder area.
- Provide a name for your contact form to distinguish it from other forms.
- You can remove any existing fields that you don’t need by clicking on the “Remove” button next to each field.
- To add a new field, enter the label name in the appropriate input box.

Step 3: Add the Dropdown Menu Field
- To create a dropdown menu field, use the dropdown menu tag generator provided by Contact Form 7.
- Click on the “Generate Tag” button next to the dropdown menu field option.
- In the tag generator, you can edit the field name and set it as required if necessary.
- Add the options for the dropdown menu, with each option on a separate line in the “Options” field.
- Click on “Insert Tag” to insert the generated tag into your form.

Step 4: Save and Publish the Form
- After completing the form-building process, click on the “Save” button to save your form.
- Copy the generated form shortcode.
- Navigate to “Pages” in the WordPress sidebar and click on “Add New” to create a new page.
- Give the page a title and switch to the code editor.
- Paste the form shortcode into the code editor.
- Click on “Publish” to publish the page.

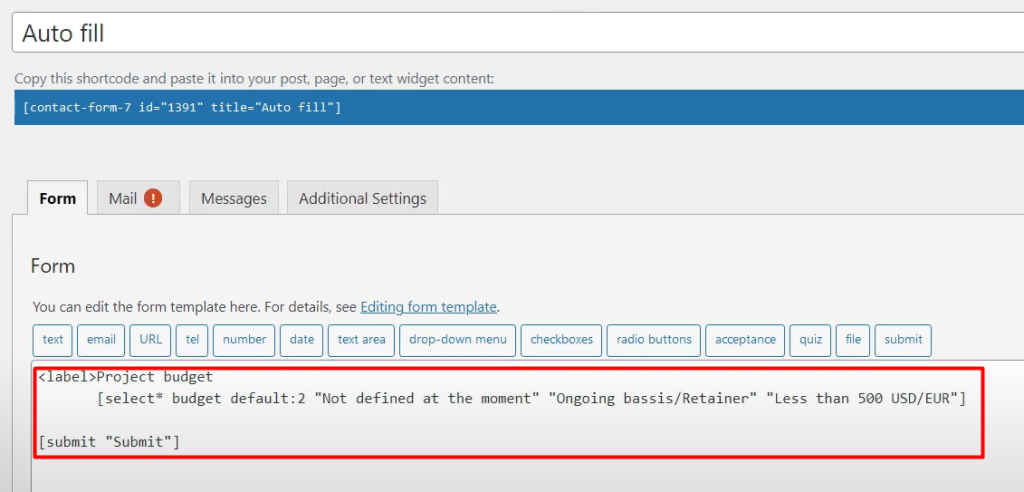
Step 5: Set the Default Field Option
- To set a default option for the dropdown menu, return to the form builder area.
- In the field settings, enter “default” followed by the option number (e.g., “default 2”) where you want to set it as the default option.
- Click on “Save” to save the changes.
Step 6: Preview the Form
- Preview the page where you published the form to see it in action.
- You will notice that the dropdown menu field displays the specified default option selected by default.
Conclusion: By following this tutorial, you have learned how to set the default field option in Contact Form 7. Customizing your forms by preselecting default options in dropdown menus enhances the user experience and simplifies the form submission process. Contact Form 7 offers a user-friendly interface and robust features for creating versatile forms in WordPress. With the ability to set default field options, you can further optimize your forms for better engagement and usability.

0 Comments