

Ninja Forms is a popular form builder plugin for WordPress that offers a wide range of features to create interactive and visually appealing forms. In this tutorial, we will explore how to set and select images for list options in Ninja Forms. This feature allows you to enhance your forms by presenting images as selectable options for users. Let’s dive in and learn how to implement this functionality.
You can also watch the video tutorial:
Having said that, let’s move on to the steps on How To Set And Select Images for List Options Using Ninja Forms In WordPress.
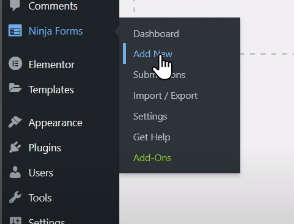
Step 1: Access Ninja Forms
- Log in to your WordPress admin dashboard.
- Hover over “Ninja Forms” in the left-hand menu and click on “Add New” to create a new form.
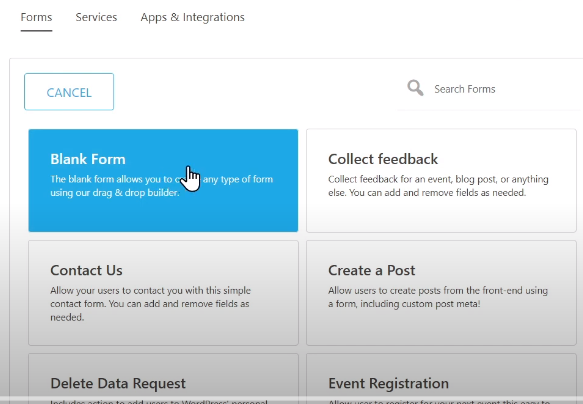
Step 2: Select a Template
- Choose a template that suits your requirements from the available options.
- Customize the form fields based on your specific needs.
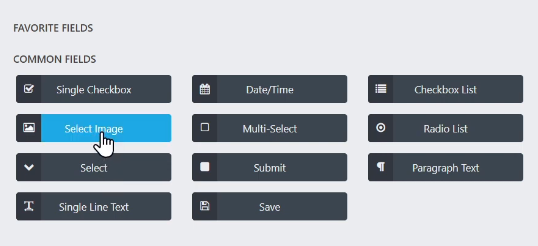
Step 3: Add Select Image Field
- Under the “Common Fields” section, locate the “Select Image” field.
- Click on it to add the field to your form.
Step 4: Edit Field Options
- Once added, you can edit the label name for the field to provide clear instructions or information to users.

Step 5: Set Image Options
- To set images as selectable options, click on the area provided under the field options.
- Select an image from your media library or upload a new one.
- Repeat this step to add various images as selectable options for users.
- You can also edit the label names for each option to provide descriptive text.

Step 6: Configure List Orientation
- Scroll down to find the option for setting the list orientation.
- Choose the desired orientation for your image options, such as vertical or horizontal.

Step 7: Publish the Form
- Once you have finished configuring the image options and list orientation, click on the “Publish” button to save the form.

Step 8: Preview the Form
- Preview the form to see how the images appear as selectable options.
- Users can now choose from the images you have set as options when filling out the form.

Conclusion: By following these steps, you can easily set and select images for list options in Ninja Forms. This feature adds visual appeal to your forms and provides users with a more engaging and interactive experience. Using images as options can be particularly useful when creating forms that involve product selection, visual preferences, or any scenario where visual representation enhances the user’s understanding and decision-making process. Now you have the knowledge to create forms with image options using Ninja Forms. Enjoy adding visual elements to your forms and providing an enhanced user experience on your WordPress website!
That concludes this video tutorial on setting and selecting images for list options in Ninja Forms. Have fun exploring this feature and creating visually appealing forms!

0 Comments