

In today’s digital age, social media plays a crucial role in driving traffic and engagement to websites. When users share content from your WordPress site on platforms like Facebook and Twitter, you want to ensure that it is displayed accurately and attractively. Open Graph is a powerful technology that empowers developers to control how shared content appears on social media. If you’re using the OceanWP theme in WordPress, enabling Open Graph is a straightforward process that can significantly enhance your website’s social media sharing capabilities.
You can also watch the video tutorial:
Step 1: Access the WordPress Dashboard:
Log in to your WordPress website and navigate to the dashboard. This is where you can manage and customize various aspects of your site.
Step 2: Go to Theme Customization:
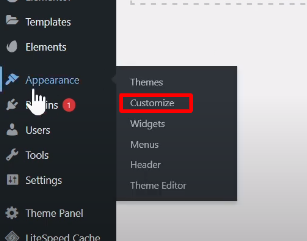
In the dashboard menu, hover over “Appearance” and click on “Customize.” This action will open the theme customization options, allowing you to modify your site’s appearance and settings.
Step 3: Locate General Options:
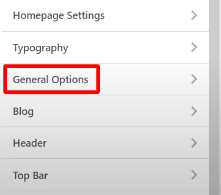
Within the customization interface, search for the “General Options” section and click on it. This section typically contains various settings related to the overall behavior and functionality of your website.
Step 4: Find Open Graph Settings:
Scroll down the General Options page until you come across the “Open Graph” settings. These settings control the Open Graph integration for your website.

Step 5: Enable Open Graph:
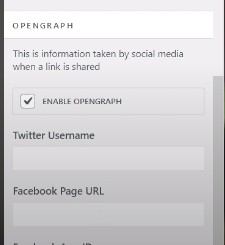
To enable Open Graph, simply check the box provided in the Open Graph settings. This action activates the Open Graph feature for your website.

Step 6: Enter Social Media Details:
Within the Open Graph settings, you’ll find fields where you can enter your Twitter username, Facebook page URL, and Facebook app ID. These details are crucial for social media sharing purposes. Providing this information allows social media platforms to associate your website’s content correctly when shared.
Step 7: Save and Publish:
After entering the required social media details, click on the “Publish” button to save and apply the changes. This action ensures that your Open Graph settings take effect and that your content will be displayed appropriately when shared on social media platforms.

Conclusion:
Enabling Open Graph in the OceanWP theme of WordPress is a simple yet powerful way to improve the social media sharing experience for your website visitors. By following the steps outlined above, you can take control of how your content appears when shared on platforms like Facebook and Twitter. With accurate and attractive previews, you can boost engagement, attract more visitors, and effectively promote your brand or message across social media channels.

0 Comments