

Gravity Forms is a popular WordPress plugin that allows you to create and manage forms on your website. In this video tutorial, we will guide you through the process of embedding a contact form using the Gravity Forms plugin. By following these steps, you will be able to display your form on a specific page and start capturing user submissions. Let’s get started!
You can also watch the video tutorial:
Having said that, let’s move on to the steps on How To Embed Gravity Contact Forms In WordPress.
Step 1: Access the Gravity Forms Plugin
- Login to your WordPress admin area.
- Navigate to the Gravity Forms section, usually found in the sidebar menu.
Step 2: Locate and Edit the Desired Form
- Locate the form you want to embed on your website.
- If you haven’t created a form yet, refer to our previous videos on how to create forms using Gravity Forms.
- Once you have identified the desired form, click on its name or the Edit button to access the form builder area.
Step 3: Open the Embed Options
- In the form builder area, you will find various options at the top of the page.
- Look for the “Embed” option and click on it.

Step 4: Choose the Embed Method
- A pop-up window will appear, presenting you with different options for embedding the form.
- If you want to embed the form on a new page, select the “Create New” option.
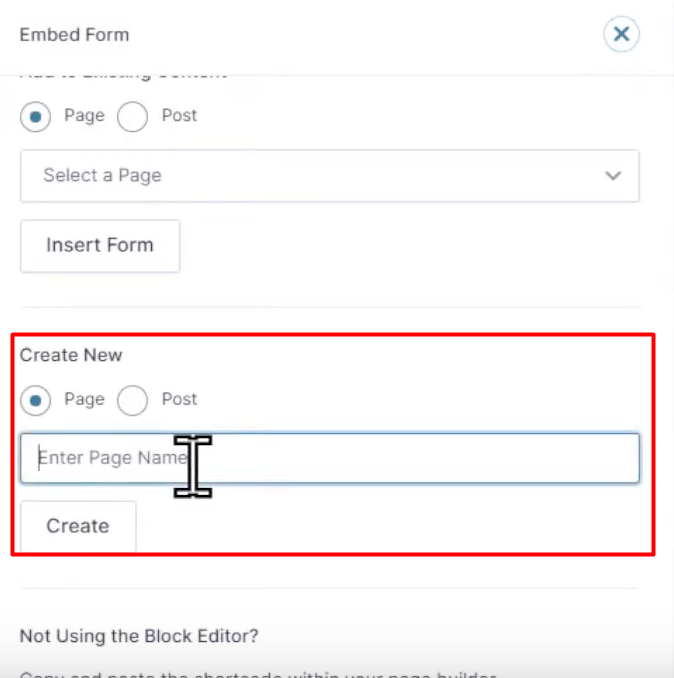
Step 5: Create a New Page
- Provide a title for the new page where the contact form will be embedded.
- Click on the “Create” button to proceed.

Step 6: Customize the Page Content (Optional)
- You will be redirected to the new page editor.
- If desired, you can customize the content of the page surrounding the embedded form.
- Add any additional text, images, or formatting as needed.
Step 7: Publish the Page
- Once you have customized the page content, click on the “Publish” button to make the page live on your website.

Step 8: View the Embedded Form
- You can now visit the page you created to see the embedded contact form in action.
- The form will be displayed on the page, ready for users to fill out and submit.
Additional Option: Embedding on Existing Page or Post
- Alternatively, you can copy the shortcode provided in the Embed options.
- Paste the shortcode into an existing page or post if you prefer to embed the form there instead.
Conclusion: Congratulations! You have successfully embedded a contact form using the Gravity Forms plugin in WordPress. By following these steps, you can easily display your forms on specific pages of your website and start collecting user submissions. Gravity Forms offers extensive customization options, allowing you to create professional and interactive forms tailored to your needs.

0 Comments