

Contact Form 7 is a widely used WordPress plugin for creating and managing contact forms on websites. In this tutorial, we will learn how to change the validation messages in Contact Form 7. By customizing these messages, you can provide clearer instructions and feedback to users when they submit the form. Let’s dive into the step-by-step process.
You can also watch the video tutorial:
Having said that, let’s move on to the steps on How To Edit Or Change Validation Message In Contact Form 7.
Step 1: Access Contact Form 7 Settings:
- Log in to your WordPress dashboard.
- In the sidebar, click on “Contact” and select “Contact Forms”.
- You will see a list of existing forms. Click on the “Edit” link of the form for which you want to change the validation message.

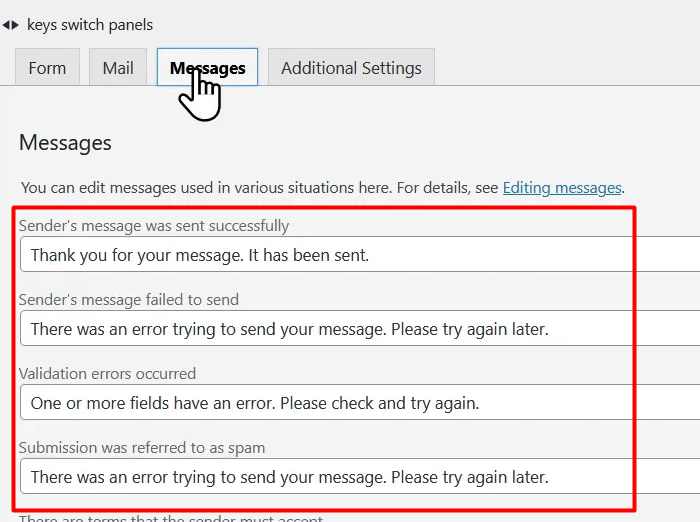
Step 2: Edit Validation Messages:
- Once you are in the form builder area, navigate to the “Messages” tab.
- Under this tab, you will find various messages related to form validation, such as required field validation, email format validation, etc.
- Locate the validation message you want to change and modify it as per your requirements.
- You can customize other messages as well, depending on your needs.
- Once you have made the desired changes, click on the “Save” button on the right to save the form.
Step 3: Embed the Form on a Page:
- To display the form on a page, hover over “Pages” in the sidebar and click on “Add New”.
- Give the page a title and paste the Contact Form 7 shortcode into the editor.
- The shortcode can be found in the “Form” tab of the form builder or by going back to the “Contact Forms” section and copying the shortcode from there.
- Click on the “Publish” button to publish the page and make the form live on your website.
Step 4: Test the Form:
- Visit the page where you have embedded the form.
- Fill in the form fields, intentionally leaving out required information or providing incorrect input to trigger validation messages.
- Submit the form to see the updated validation messages in action.
- You should now see the modified validation messages according to your changes.

Conclusion:
By following these steps, you have successfully learned how to change the validation messages in Contact Form 7. Customizing these messages allows you to provide clearer instructions and feedback to users, improving their form-filling experience. Experiment with different message edits to align them with your website’s tone and enhance user understanding. Enjoy the flexibility and customization options offered by Contact Form 7 to create effective and user-friendly contact forms on your WordPress site.

0 Comments