

Ninja Forms is a versatile form builder plugin for WordPress that allows you to create customized forms. In this informative video tutorial, we will guide you on how to add a radio list field using Ninja Forms. The radio list field enables users to select a single option from a list of predefined choices. Let’s walk through the steps to incorporate this field into your forms.
You can also watch the video tutorial:
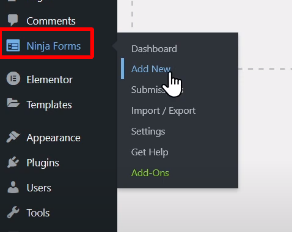
Step 1: Access Ninja Forms
- Log in to your WordPress admin dashboard.
- Hover over “Ninja Forms” in the left-hand menu and click on “Add New” to create a new form.
Step 2: Select a Template
- Choose a template that aligns with your form requirements from the available options.
- Select the template that best suits your design preferences by clicking on it.

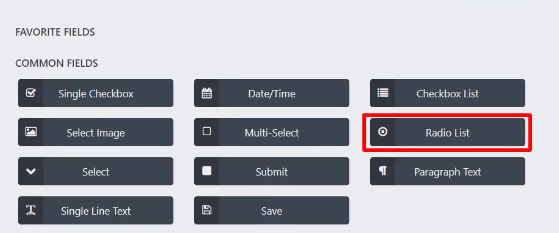
Step 3: Add the Radio List Field
- Under the “Common Fields” section, locate the “Radio List” field.
- Click on it to add the field to your form builder area.
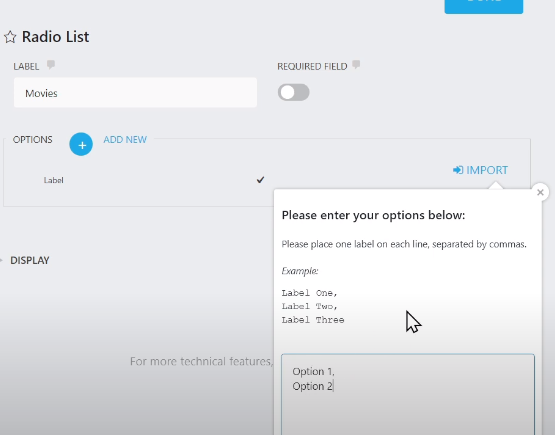
Step 4: Customize Field Options
- Once added, click on the radio list field to access its options.
- Edit the label name to describe the purpose of the radio list to users.
- Remove any default options that are not relevant to your form.

Step 5: Add Options
- To add multiple options in bulk, click on the “Import” button.
- Enter each option on a separate line.
- After entering all the options, click on “Import” to add them to the radio list field. Alternatively, you can add individual options by clicking on “Add New” and entering them one by one.
Step 6: Finalize and Publish the Form
- Once you have configured the radio list field and any other desired form elements, click on the “Done” button.
- Give your form a name in the provided field to help identify it within your Ninja Forms dashboard.
- Click on the “Publish” button to save and publish your form.

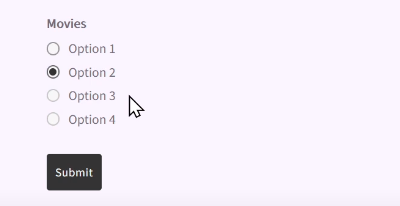
Step 7: Preview the Form
- After publishing the form, click on the “Preview” button to see how it appears to users.
- Test the radio list field by selecting options and observing the behavior.
Conclusion: By following these steps, you can easily add a radio list to your forms using Ninja Forms. The radio list field is valuable when you want users to select a single option from a predefined list of choices. It is commonly used for multiple-choice questions or when you require users to make a single selection from a set of options.
Now you have the knowledge to incorporate a radio list into your contact forms using Ninja Forms. Enjoy creating forms that offer users clear and concise options to choose from. We hope this video tutorial has been helpful in guiding you through the process of adding a radio list in Ninja Forms. Feel confident in implementing this field in your forms and enhancing the user experience.

0 Comments