

In WooCommerce, setting up shipping zones allows you to define specific geographical areas to which you ship your products. By configuring shipping zones, you can apply different shipping methods and costs based on the customer’s location. In this tutorial, we will guide you through the process of adding a shipping zone in WooCommerce.
You can also watch the video tutorial:
Having said that, let’s move on to the steps on How To Add Shipping In Woocommerce.
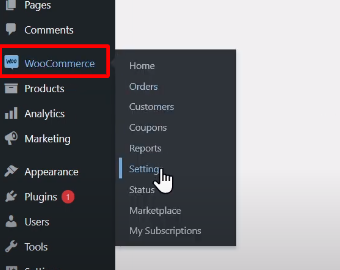
Step 1: Access WooCommerce Settings
- Hover over the “WooCommerce” menu in the WordPress admin dashboard.
- Click on “Settings” to access the WooCommerce settings page.
Step 2: Navigate to Shipping Settings
- Within the WooCommerce settings page, click on the “Shipping” tab.
- Here, you will find various options related to shipping configuration.

Step 3: Create a Shipping Zone
- To create a new shipping zone, click on the “Add Shipping Zone” button.
- Select the zone by choosing the desired geographical area, such as a specific country or region.
- Click on the “Zone Regions” field to select the regions included in the shipping zone.

Step 4: Add a Shipping Method
- After creating the shipping zone, you need to add a shipping method for that zone.
- Click on the “Add Shipping Method” button.
- Choose the desired shipping method from the available options, such as flat rate, free shipping, or local pickup.
- Click on the “Add Shipping Method” button to proceed.

Step 5: Configure the Shipping Method
- To set up the shipping cost for the chosen shipping method, click on the “Edit” link next to the method.
- Modify the title, tax status, and other relevant settings according to your requirements.
- In the “Cost” field, specify the shipping charges using different options like a flat rate, percentage-based cost, or minimum fee.
- Utilize available placeholders to create dynamic shipping costs based on order details.
- Click on the “Save Changes” button to save the settings for the shipping method.

Conclusion:
By following these steps, you can easily add a shipping zone in WooCommerce. Shipping zones enable you to define specific geographical areas to which you ship your products, and they allow you to apply different shipping methods and costs based on customer location. Take advantage of WooCommerce’s flexible shipping configuration to streamline your shipping process and provide accurate shipping options to your customers.

0 Comments