

Introduction:
In this tutorial, we will guide you through the process of adding a poll to your WordPress website using the Gravity Forms plugin. By leveraging the Poll add-on, you can create interactive and engaging polls that allow your website visitors to provide their input easily. Let’s dive in!
You can also watch the video tutorial:
Having said that, let’s move on to the steps on How To Add Poll In Gravity Forms.
Step 1: Install and Activate the Gravity Forms Plugin:
- Make sure you have successfully installed and activated the Gravity Forms plugin on your WordPress website.
- From the WordPress dashboard, hover over “Forms” in the sidebar and select “Add-Ons.”
- Search for the “Polls” add-on and activate it.

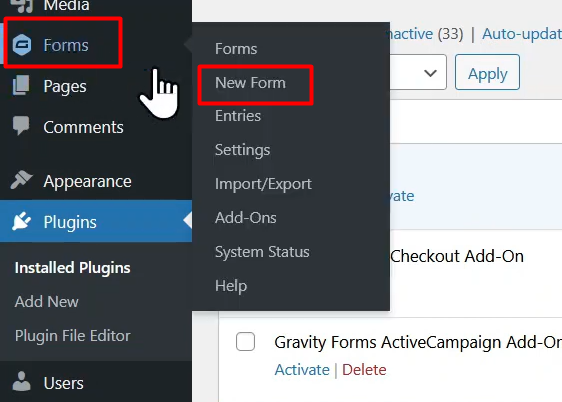
Step 2: Create a New Form:
- Hover over “Forms” again and click on “Add New.”
- Provide a title and optionally add a brief description for your form in the pop-up window.
- Click on “Create Form” to proceed to the form builder.
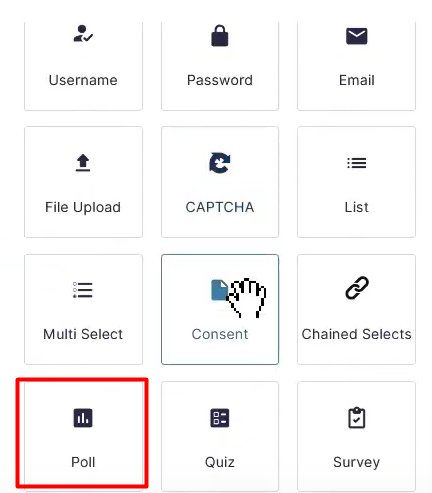
Step 3: Add the Poll Field:
- In the form builder area, you will find various standard fields on the right side.
- Expand the “Advanced Fields” tab and locate the “Poll” field.
- Drag and drop the Poll field onto the form builder area.
- Configure the field settings by clicking on it. You can add a field description, edit the choices, and customize the poll title.
- Optionally, check the boxes for enabling name fields.
- Save the form by clicking on the “Save Form” button at the top.
Step 4: Embed the Form:
- After saving the form, click on the “Embed” button.
- Select the page or post where you want to embed the form.
- Give it a name and click on “Create.”
- The form will be embedded on the selected page or post.

Step 5: Publish the Page:
- Once the form is embedded, publish the page or post to make it live on your website.
Step 6: Test the Poll:
- Visit the page where you embedded the form.
- You will see the poll displayed on the page.
- Make a test entry and submit the poll to see how it works.

Conclusion:
Congratulations! You have successfully added a poll to your WordPress website using the Gravity Forms plugin and its Poll add-on. By following the steps outlined in this tutorial, you can create engaging polls that encourage user participation and provide valuable insights. Enjoy the flexibility and interactivity offered by Gravity Forms to enhance user engagement on your website.

0 Comments