

In this tutorial, we will demonstrate how to add an HTML field in Ninja Forms. The HTML field allows you to display formatted text, links, and media anywhere on your form. Let’s walk through the process.
You can also watch the video tutorial:
Having said that, let’s move on to the steps on How To Add HTML Field In Ninja Forms.
Step 1: Access the Ninja Forms Dashboard
- Hover over “Ninja Forms” in the WordPress admin dashboard.
- Click on “Dashboard” to access the Ninja Forms settings.

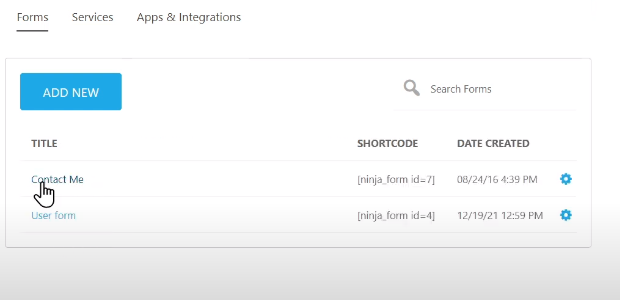
Step 2: Select or Create a Form
- Choose an existing form from the list or create a new one based on your requirements.
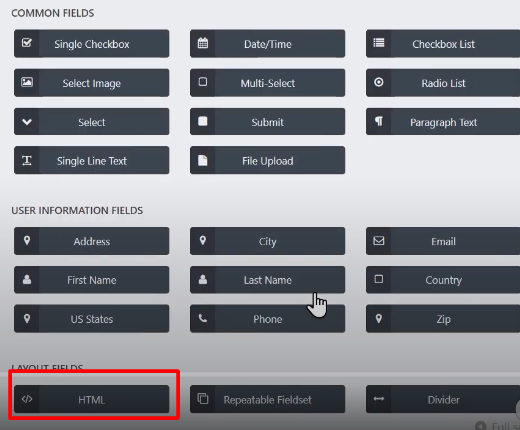
Step 3: Add the HTML Field
- To add the HTML field, click on the plus icon located in the form builder area.
- Look for the “HTML” field under the “Layout Fields” section.
- Drag and drop the HTML field to the desired position on the form.
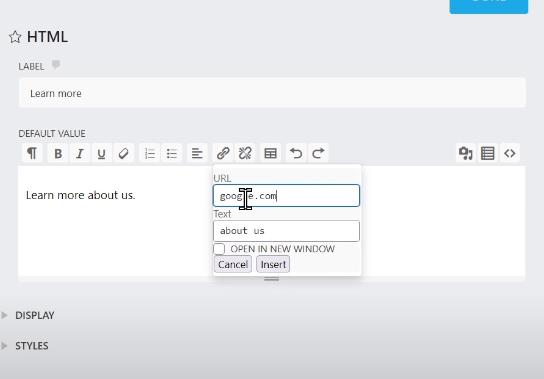
Step 4: Configure the HTML Field
- Click on the HTML field to explore its settings.
- Edit the label of the field to provide a clear description or instruction to users.
- Enter your desired text, links, or media in the provided field.
- You can use HTML tags and formatting to customize the appearance of the content.
- For embedding videos, paste the video embed code into the HTML field.
Step 5: Publish the Form
- Once you have finished configuring the HTML field and making any other desired changes to the form, click on the “Publish” button to save and publish the form.
- Give your form a name to easily identify it in your form list.
Step 6: Preview the Form
- Use the preview function to see how the form appears to users.
- Verify that the HTML field is displaying the desired content, including any embedded media or links.

Conclusion: By following these steps, you can successfully add an HTML field to your Ninja Forms. This field allows you to insert formatted text, links, and media, giving you the flexibility to customize the content displayed on your forms.
The HTML field is particularly useful for providing additional information, instructions, or rich media content within your forms. It allows you to create a more engaging and interactive user experience.
Now you know how to incorporate an HTML field in your Ninja Forms. Leverage this feature to enhance your forms and present content in a visually appealing and informative manner.
That concludes this tutorial on adding an HTML field in Ninja Forms. We hope you found it helpful and are excited to utilize this feature to customize and enhance your forms. Enjoy the flexibility and creative possibilities offered by the HTML field in Ninja Forms!

0 Comments