
Scalable Vector Graphics (SVG) logos offer high-quality and scalable graphics for your WordPress website. By following these steps, you can easily add an SVG logo to your site, ensuring crisp and professional-looking graphics that retain their quality at any size. In this video tutorial, we will guide you through the process of adding an SVG logo to your WordPress website using the SVG Support plugin and the theme customizer.
You can also watch the video tutorial:
Adding an SVG Logo in WordPress:
Step 1: Access the WordPress Admin Dashboard:
Log in to your WordPress website and navigate to the WordPress admin dashboard. This is where you can manage and customize your site.
Step 2: Install and Activate the SVG Support Plugin:
Hover over “Plugins” in the dashboard menu and click on “Add New.” In the search bar, enter “SVG Support” and press Enter. Locate the “SVG Support” plugin and click on “Install Now.” After installation, click on “Activate” to activate the plugin. The SVG Support plugin enables SVG functionality on your website.

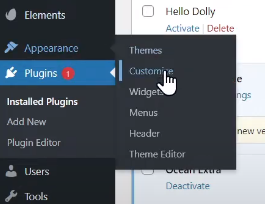
Step 3: Access the Theme Customizer:
Hover over “Appearance” in the dashboard menu and click on “Customize.” This will open the theme customizer, which allows you to customize various aspects of your website’s appearance.
Step 4: Customize the Header Settings:
In the customizer sidebar, click on “Header” to access the header settings.

Step 5: Select the Logo Option:
Within the header settings, locate the “Logo” option and click on it.
Step 6: Add Your SVG Logo:
To add your SVG logo, click on “Select Logo” and choose the SVG image from your computer. Alternatively, you can select the SVG logo from the media library if it’s already uploaded.
Step 7: Skip Cropping:
After selecting the SVG logo, click on “Skip Cropping.” Since SVG files are scalable vector graphics, cropping is not necessary.
Step 8: Adjust Logo Size (if needed):
If your logo appears too large for the header, you can use the “Max Width” option to resize it to the desired size.
Step 9: Save Your Changes:
Once you have made any necessary adjustments, click on the “Publish” button to save your changes. This will apply the SVG logo to your WordPress website.
Conclusion:
Congratulations! You have successfully added an SVG logo to your WordPress website. By following these steps, you can ensure that your logo is displayed correctly, maintaining its scalability and quality. The SVG Support plugin enables SVG functionality, allowing you to use crisp and professional-looking graphics on your site. Enjoy the benefits of SVG graphics and enhance the visual appeal of your website. Remember to select an SVG file for your logo, as other image formats may not be compatible with the SVG Support plugin. Feel free to further customize your website and explore additional options to make it truly unique.
That concludes this tutorial on adding an SVG logo in WordPress. We hope you found it helpful and are excited to see your website with a sleek and scalable SVG logo!

0 Comments