

Ninja Forms is a versatile form builder plugin for WordPress that empowers users to create and manage various types of forms on their websites. Accessing and customizing the display settings is crucial for creating visually appealing and user-friendly forms. In this article, we will guide you through the process of accessing and configuring Ninja Forms’ display settings to suit your specific requirements.
You can also watch the video tutorial:
Having said that, let’s move on to the steps on How To Access Ninja Form’s Display Settings WordPress Tutorial.
Step 1: Access the Ninja Forms Dashboard
- Log in to your WordPress admin dashboard.
- In the left-hand menu, hover over “Ninja Forms” and click on “Dashboard.”

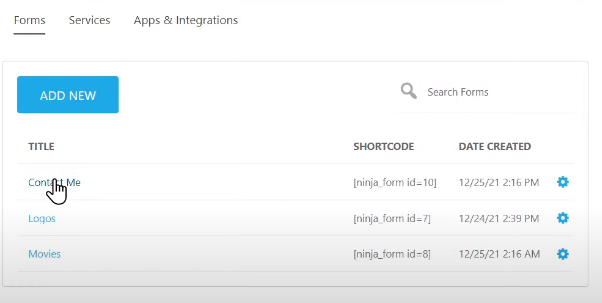
Step 2: Select the Form
- On the Ninja Forms dashboard, you’ll find a list of the forms you have created.
- Locate the form for which you want to configure the display settings and click on its name.
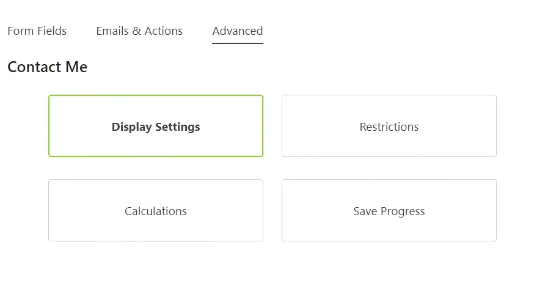
Step 3: Navigate to the Advanced Tab
- After selecting the form, you will be directed to the form builder interface.
- Look for the tabs at the top of the page and click on the “Advanced” tab.

Step 4: Access the Display Settings
- Within the Advanced tab, you will find various settings options.
- Locate the “Display Settings” option and click on it.
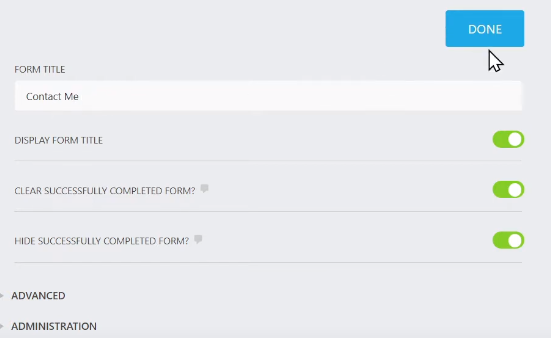
Step 5: Configure the Display Settings
- Clicking on the Display Settings option will reveal a new section with several customization options.
- Edit the form title: Modify the form title by entering a new title in the provided field.
- Enable or disable the form title: Toggle the switch to show or hide the form title display.
- Make desired changes to the display settings according to your preferences.
Step 6: Preview and Publish the Form
- Before finalizing the display settings, it’s recommended to preview the form.
- Click on the “Preview” button to see how the form appears with the updated display settings.
- If you are satisfied with the changes, click on the “Publish” button to save and publish the form.
Step 7: View the Updated Form
- After publishing the form, refresh the page where the form is embedded to see the changes.
- If you disabled the form title, it will no longer be visible on the form.

Conclusion: By following these steps, you can easily access and configure Ninja Forms’ display settings to customize the appearance and behavior of your forms. Whether you want to edit the form title or hide it entirely, the display settings provide the flexibility to align your forms with your website’s design and requirements. Remember to save and publish the form after making any changes to ensure the updated display settings take effect. Enjoy creating visually appealing and user-friendly forms with Ninja Forms on your WordPress website!

0 Comments